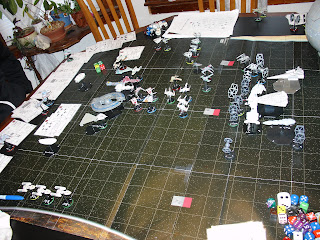
Here's the set-up. We fielded pretty much every fighter I could explain as being used at the time (~ -0.1 to 0 ABY) plus some TIE Interceptors (which Ijust pretended were prototypes guarding the Empire's most important project). That's the MicroMachines Death Star I in the background. It unfolds into a whole playset; much cooler than the MicroMachines Death Star II (bottom of the page) that we also had as kids. This one isn't as big, but it's an actual sphere, not just a round front and flat back.
Here's Auggie. He played the Rebels....poor b*****d. To be fair though, that's the side he picked for today.
Round 2, Combo pic of first moves (Round 1 is usually just all the carrier ships holding position until they launch their 1st wave of fighters). The Imperials set up a defensive line of fighter cover, while you can see the Rebels trying to out-flank the Imperial fighters with a pincer-attack of Y-Wings. In the background on the right, you can see the 1st wave of TIE Interceptors launching from the Death Star.
Round 2, fighters reaction move. TIEs hold position while the X-Wings mirror the Y-Wing pincer attack.
End of Round 3. Some long range Turbolaser shots were exchanged, but no real damage incurred; except for the Rebel Dreadnought Harrier, which suffered a hull breach from concentrated fire by the Imperials. No real loss to effectiveness, however.
Round 4, fighter reaction move. All the fighters begin to pile up into a giant "furrball".
Round 4, end of round. It doesn't go so well for the Rebel fighter jocks this turn. The Strike Cruiser "Talon" starts taking damage from enemy fire.
Round 5, fighter reaction move. Nearly all the Rebel fighters commence their bombing runs on the Talon (this can't end well).
Round 5, end of turn. Heavy fire was exchanged between all parties. Concentrated bomber attacks finish off the Talon, and while both the Admonitor (ISD) and the Valorum (VSD) have taken heavy damage, both have yet to suffer a hull breach or loose systems. On the Rebel side, the Harrier (Dreadnought) has suffered its 2nd hull breach and is in serious danger of becoming a useless hulk soon. The Ranger (CR90) has taken serious damage and a well timed attack by the Imp-Star took out the Medium Transport "Luminous" before it could even get off a shot.
Round 6. Almost all remaining Rebel fighters begin concentrated bombing attacks on the Admonitor.
Round 6, end of turn. By dint of a heroic effort on the part of the Imperial fighter pilots, almost all the fighter attacks against the Imperial Star Destroyer are intercepted. The few that get through fail to do any lasting damage. The Admonitor punishes the Harrier with it's Turbolasers and with several lucky shots, takes down all of the Profiteer's (Lucrehulk) shields, leaving it defenseless. On the Valorum's (VSD) turn, it tares into both the Harrier and Profiteer with it's Turbolasers, completely destroying the Dreadnought and decimating the Lucrehulk's hull to less than 50% left.
The Rebel commander is not pleased.
Round 7. The Profiteer takes heavy damage from the Admonitor, and while it manages to retaliate and finally pierce the ISD's hull, it is devastated by a massed bombing run by the TIEs. The CR90 "Ranger" is later destroyed by the Turbolaser barrage from the Valorum, and the Rebel Escort Carrier "Kyushu" is destroyed by further massed bombing runs.
At the end of the turn, all that remains of the Rebel invasion fleet are the Escort Carrier "Flurry" and the Consular-class cruiser Lucky Lady, both of which have been completely disabled by Ion hits. The Death Star remains safe and approaches ever closer to completion.
The Rebel commander remains in good spirits, however.
Thoughts: Despite the devistatingly one-sidedness of the outcome, I feel pretty good about this scenario. The Imperials won initiative every round, without fail. Added to that was their uncanny ability to roll 6's (which always hit - and sometimes do 2 damage) as opposed to the Rebel's unusally high percentige of rolled 5's, the game feels pretty reasonable. I'm thinking of weitching a few TIEs out for a Nebulon-B or a Lancer, though....We'll see how a rematch goes.


No comments:
Post a Comment